How to setup a Zotero WebDAV server with a Raspberry Pi
There are quite a few options now for reference management software, but Zotero has always been the only completely free option. One under-appreciated feature is that if you want a synchronised PDF library across several workstations, Zotero will allow you to do that by letting you use your own WebDAV server. Problem: how does one make a WebDAV server?
This tutorial essentially has this goal in mind: create a WebDAV server that will work with Zotero all the time with no concerns about disk space and no running cost. Now, here's the catch: to have a server running all the time, the best option is really to buy a Raspberry Pi , configure it as a WebDAV server and leave it running in a corner of your house/workplace. You get the overhead cost of a yearly subscription of paperpile for a lifetime supply of the same service. Another point, since we don't want to buy a domain and subscribe to a DNS service, we will use our public IP as the domain name for connecting via the internet, but there's no real downside to that since this is for private use.
1. Setup the Raspberry Pi
Hardware
At first you will obviously need a screen, keyboard and mouse plugged into the Pi. Then, you can connect to your network (ethernet or wifi) and set up some remote-control software, such as VNC Viewer or SSH to control the Pi directly through a remote terminal. At this point you can essentially leave the Pi as such with just the power supply plugged, and the ethernet cable if you chose that method over wifi.
Basic Software
Let's properly setup the Raspberry Pi OS first. This section is based on this tutorial, except we do not touch on setting up the SSH protocol, but feel free to look into it as well if you want to.
Let's first update the system to its latest version. In a terminal, enter the following:
- sudo apt-get update
- sudo apt-get dist-upgrade
- sudo apt-get autoremove
Next, we will setup a regular user profile, and then grant that profile superuser privileges.
- adduser your_user_name
- usermod -aG sudo your_user_name
Now log in as your_user_name. This manipulation allows you to have superuser privileges when you want to
by typing sudo before any command, but you won't have any superuser privilege if you omit it.
This way of setting up user privileges is generally good practice to avoid doing any accidental damage to
the system following an unfortunate command.
And finally, we need to setup a firewall.
- ufw enable
2. Create a WebDAV server using the HTTP protocol
This section is based on step 2 of this tutorial for creating the WebDAV server and step 5 of that tutorial for creating the virtual host. A virtual host is essentially a configuration profile for the WebDAV server that is specific to a user-defined set of directories. This allows us to create different websites with different configurations on the same machine (Raspberry Pi).
First, we will need to install apache2 , which is the most common package to create WebDAV servers on linux systems.
- sudo apt-get update
- sudo apt-get install apache2
Next we create the directory in which the WebDAV server will live, and give ownership of that directory to the apache user so that it is allowed to manage it.
- sudo mkdir /var/www/webdav
- sudo chown -R www-data:www-data /var/www/
And we activate the a2enmod shell script and use it to activate the WebDAV modules.
- enable a2enmod
- sudo a2enmod dav
- sudo a2enmod dav_fs
Next, we need to create a configuration file for our server. In Apache, configuration files are stored
in /etc/apache2/sites-available/. Several files can be stored there depending on how many
websites your machine hosts. The default configuration file is 000-default.conf.
Let's create our own configuration file, called webdav.conf. To edit files in Linux, I use
nano, but feel free to use whatever editor you prefer. If you're unsure, nano is usually a good choice as
it is simpler to use.
- sudo nano /etc/apache2/sites-available/webdav.conf
In this file, copy and paste the content below.
DavLockDB /var/www/DavLock
<VirtualHost *:80>
    ServerAdmin your_email_here
    DocumentRoot /var/www/html

    ErrorLog ${APACHE_LOG_DIR}/error.log
    CustomLog ${APACHE_LOG_DIR}/access.log combined

    Alias /webdav /var/www/webdav

    <Directory /var/www/webdav>
        DAV On
    </Directory>
</VirtualHost>

# vim: syntax=apache ts=4 sw=4 sts=4 sr noet
To save and close the file, press CTRL + X, then y for "yes", and finally press
"enter".
You can find details about what each line in the configuration file means
here.
Essentially, we are indicating that the website is on port 80 of the router (usual port for HTTP protocol), and
pointing out the root location of the website on the system, which means when you call your public IP on a browser,
the server will display /var/www/html/index.html. The Alias line means that
when you call http://your_ip_here/webdav, the server will display /var/www/webdav.
The DAV On line simply toggles the WebDAV service on for the assigned directory, so /var/www/webdav
will behave like a WebDAV folder rather than a normal website.
Next, we disable the default configuration file and enable our WebDAV configuration file
- sudo a2dissite 000-default.conf
- sudo a2ensite webdav.conf
We can test that the configuration file has been set up properly using a built-in tool from the apache2 package
- sudo apache2ctl configtest
If everything is set up properly we should get a Syntax OK output. You may also see this
error: AH00558: Could not reliably determine the server's fully qualified domain name.
This should not be a problem for what we are trying to do, but you can see
here
for how to fix it if you want to.
Finally, set a port-forwarding rule in your router to link the port 80 to your Raspberry Pi's private
IP address. Open your favorite browser, type in 192.168.0.1 and login to your router. If you
are not sure how to do it, this usually depends on the internet service provider who provided the internet
box of your house. Find out the brand and check on your ISP's website what is the default login.
Navigate to the port-forwarding tab of your router interface and create a new rule:
- Common Application: -SERVICES-
- Application Name: whatever_you_want
- Protocol: TCP
- Public Port Range: 80-80
- Private Port Range: 80-80
- Local IP Address:
The local IP address of your Raspberry Pi. You can retrieve it by entering
hostname -I | awk '{print $1}'in your machine's terminal - Remote IP Address: "Any", or if you plan to connect only from a defined set of IP locations you can specify those to increase security.
- Rule Status: ON
Restart apache:
- sudo systemctl restart apache2
You should now be able to access the server online at http://your_ip_here/webdav/
3. Create a WebDAV server using the HTTPS protocol
Configure the firewall
Depending on your version of apache, your firewall could list the apache-related
applications as "WWW" or "Apache". To check this out, type sudo ufw app list in a terminal to
see if the list contains WWW, WWW Full and WWW Secure, or
Apache, Apache Full and Apache Secure. From here onward, I will
assume that your firewall uses WWW but please swap WWW for Apache
if you need to.
Let's change the firewall rules to allow for both HTTP and HTTPS communication, and disable the rule for HTTP-only communication.
- sudo ufw allow "WWW Full"
- sudo ufw disable allow "WWW"
Next we enable apache's mod_ssl module and restart apache to apply the changes.
- sudo a2enmod ssl
- sudo systemctl restart apache2
Edit the configuration file
We then edit our webdav.conf file, so its content looks like this eventually
DavLockDB /var/www/DavLock
<VirtualHost *:443>
    ServerAdmin your_email_here
    ServerName your_ip_here
    DocumentRoot /var/www/html

    SSLCertificateFile /etc/ssl/zotero_webdav.crt
    SSLCertificateKeyFile /etc/ssl/zotero_webdav.key

    ErrorLog ${APACHE_LOG_DIR}/error.log
    CustomLog ${APACHE_LOG_DIR}/access.log combined

    Alias /webdav /var/www/webdav

    <Directory /var/www/webdav>
        DAV On
    </Directory>
</VirtualHost>

# vim: syntax=apache ts=4 sw=4 sts=4 sr noet
As a reminder, the terminal command for that purpose (if you use the nano editor) is:
- sudo nano /etc/apache2/sites-available/webdav.conf
Note that on the second line, the virtual host is now 443 and not 80 anymore. Finally, we check that the syntax is correct and restart the apache server to apply the changes.
- sudo apache2ctl configtest
- sudo systemctl restart apache2
Set up the port forwarding rule
We must now add a new port forwarding rule on the router for port 443. It's the exact same thing as when we set up the rule for the HTTP protocol above, except that we replace all the 80-80 port ranges with 443-443. Please keep the port 80 rule on as well, it will be useful for when we enable HTTP-to-HTTPS transfer below.
Get a SSL certificate for the WebDAV server
Now we need a SSL certificate for the HTTPS protocol to actually work properly. See the introduction of this tutorial for an explanation of what a SSL certificate is and why we need one.
Usually, SSL certificates are provided by third parties called Certificate Authority (CA). Now, the issue with CAs is that they don't all provide certificates for bare IP addresses, and those that do (e.g. ZeroSSL) eventually require a subscription. So instead we're going to use a self-signed certificate. Those are usually not trusted online because they essentially signal that the website has been "vetted" by the person who controls the website rather than by an independent authority (the CA). This usually matters because most websites are not visited by the website owner but by the general public and so third-party confirmation allows to have an independent confirmation that the website is secure. But for us this doesn't matter as the WebDAV server is for private use only.
Now certificates expire after a while, specifically 365 days or 90 days depending on what you chose when you request it. This is for the same reason as why we should change our password regularly, to ensure a more secure encryption over time. Consequently, 90-days certificate tend to be better than 365-days certificates.
First, let's ensure the recipient directories for the certificate exist.
- sudo mkdir /etc/ssl/certs/
- sudo mkdir /etc/ssl/private/
Next, let's request the certificate using OpenSSL, which should come pre-installed with most linux. If not, you may have to install it.
- sudo apt-get install openssl
- sudo openssl req -x509 -nodes -days <365-or-90> -newkey rsa:2048 -keyout /etc/ssl/private/zotero_webdav.key -out /etc/ssl/certs/zotero_webdav.crt
- sudo systemctl restart apache2
Don't foget to pick a choice for the -days option.
Fill in all the information (the Common Name should be your_ip_address).
Once this is done, you should be able to access your server online using the HTTPS protocol at
https://your_ip_here. Your browser will most likely warn that the SSL certificate is
self-signed. You can tell it to ignore this warning, which will add the SSL certificate for your server
to the browser's whitelist.
Automatic renewal of the SSL certificate
Linux systems come with a package called CRON for automatically running commands and programs.
This is what we're going to use here. The below example is set to renew the SSL certificate every 89 days
at 5:00 AM. That's one less than 90 days to avoid "off" time between certificates.
If you want to renew every 364 because you installed a 365-days SSL certificate,
replace 0 5 */89 * * by 0 5 */364 * * in the code snippet below. Also, don't
forget to include the information such as Common Name, City, Country, etc in the openssl
command.
- cd ~/Documents # to make sure we're in a directory with write access
- sudo crontab -l > mycron # write out current crontab
- # echo new cron into cron file
- echo "0 5 */89 * * sudo openssl req -x509 -nodes -days 365 -newkey rsa:2048
-subj "/C=<Country Code>/ST=<State>/L=<City>/O=<Organization>/CN=<your_ip_here>"
-keyout /etc/ssl/private/zotero_webdav.key
-out /etc/ssl/certs/zotero_webdav.crt
&& sudo systemctl restart apache2" >> mycron
- # install new cron file and remove tmp file
- sudo crontab mycron
- rm mycron
Your SSL certificate should now be installed.
HTTP to HTTPS transfer
Now to be able to access the website at https:// with the http address, add
this at the bottom of webdav.conf (before the last line):
<VirtualHost *:80>
    ServerName your_ip_here
    Redirect / https://your_ip_here/
</VirtualHost>
Then run in a terminal
- sudo apachectl configtest
- sudo systemctl reload apache2
Then you can test this online by connecting to your website with either the http:// or
https prefix.
4. Adding authentication
Just follow step 3 of
this tutorial.
The only difference is that we will edit /etc/apache2/sites-available/webdav.conf instead of
/etc/apache2/sites-available/000-default.conf. Our configuration file now looks like this:
DavLockDB /var/www/DavLock
<VirtualHost *:443>
    ServerAdmin your_email_here
    ServerName your_ip_here
    DocumentRoot /var/www/html

    SSLCertificateFile /etc/ssl/zotero_webdav.crt
    SSLCertificateKeyFile /etc/ssl/zotero_webdav.key

    ErrorLog ${APACHE_LOG_DIR}/error.log
    CustomLog ${APACHE_LOG_DIR}/access.log combined

    Alias /webdav /var/www/webdav

    <Directory /var/www/webdav>
        DAV On
        AuthType Digest
	      AuthName "webdav"
	      AuthUserFile /etc/apache2/users.password
	      Require valid-user
    </Directory>
</VirtualHost>

<VirtualHost *:80>
    ServerName your_ip_here
    Redirect / https://your_ip_here/
</VirtualHost>

# vim: syntax=apache ts=4 sw=4 sts=4 sr noet
TL;DR: make the changes to the configuration file as above, then run:
- sudo apt-get install apache2-utils
- sudo htdigest -c /etc/apache2/users.password webdav your_login_name_of_choice # this will ask you to enter a password of choice twice
- sudo chown www-data:www-data /etc/apache2/users.password
- sudo a2enmod auth_digest
- sudo service apache2 restart
5. Setup Zotero
Configuring the settings
On the machine that runs Zotero (your laptop, workstation, etc.), open Zotero, and go to
Edit >> Preferences >> Sync. On the "File Syncing" section, put these options:
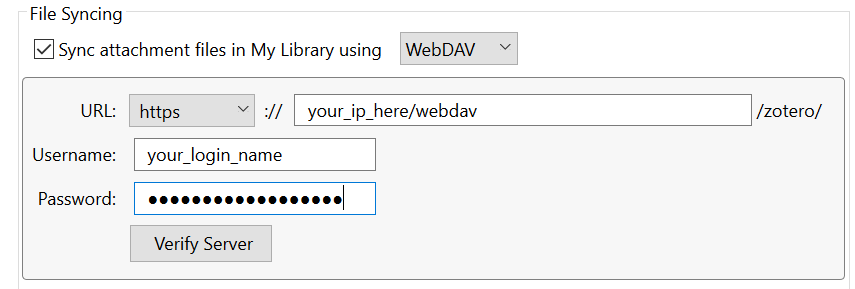
Your username and password will be those defined in step 4. above.
Whitelisting the self-signed SSL certificate
Zotero will not accept self-signed SSL certificates unless they are whitelisted, a process for which they do
not yet have a GUI for, unfortunately. Here is the
Zotero KB tutorial
for how to add the SSL certificate to the whitelist. Don't forget to strip the ":" from the
cert_override.txt if you use the latest Mozilla Firefox version, as indicated in the note of the
KB tutorial and
this
error report.
Unfortunately there is now way yet to automatize the whitelisting. So this will have to be re-done everytime the SSL certificate gets renewed. Also it must be done on every machine that runs Zotero (for which you want to use the synchronized library of course).